
Tuesday, July 30, 2013
Sunday, July 21, 2013


Thursday, July 18, 2013


Monday, July 15, 2013


Sunday, July 14, 2013


Saturday, July 13, 2013
DIY Coconut Milk Shampoo

Today
is the third consecutive day of beautiful weather here in Philly, so naturally
it’s time to start thinking about summer. Whenever I do, the summer scents are
always at the forefront of my mind: the sweet smell of the summertime air when
you open your windows, the scent of fresh flowers as you walk through the
garden, and, of course, coconut everything. Nothing brings about that summer
feeling more than the delicious smell of coconut, and today I have a recipe
that will lock that glorious summertime scent in your hair: homemade coconut
milk shampoo.
What you need:
1/2
cup coconut milk
2/3 cup castile soap
1 tsp vitamin E oil
1 tsp coconut oil
2/3 cup castile soap
1 tsp vitamin E oil
1 tsp coconut oil
Like
many beauty products, the ingredients can be altered to fit your scent
preference, as long as these two stay the same: coconut milk and castile soap.
As for oil, you can use vitamin E, coconut, almond, or olive. You can also add
a few drops of essential oil if you like. I think next time I will go with
lavender or vanilla.
What you do:
If
you’re using coconut oil, place it in the microwave for about 30 seconds or
until it’s fully melted. Combine all ingredients in a container with a lid, and
shake. To use, shampoo your hair as you normally would. Use 1-2 teaspoons of
the shampoo, depending on hair length and thickness. You can store one batch in
your shower for up to a month.
I
can already tell this is going to be my go-to shampoo for the spring and
summer. Not only does the mixture smell delicious, the castile soap makes it an
excellent hair cleanser, and the milk and oils help to lock moisture into your
hair, while simultaneously keeping you free of frizz. That’s really all I could
ever ask for in a summer shampoo.
If
you decide to make your own coconut milk shampoo, let us know how it turns out!
XO,
Rachel
DIY: Coconut Lavender Conditioner

Coconut oil is actually an excellent conditioner on its own, but I decided to add a couple extra ingredients into the mix for some added hair benefits, as well as lavender oil for scent! This conditioner is very, very moisturizing, so you only need a tiny bit — and it will last you a long time. It also smells like pure bliss. So without further ado, here is your recipe for homemade coconut lavender conditioner!
What you need:
1 cup coconut oil (get organic if you can!)
1 teaspoon vitamin E oil
1 teaspoon jojoba oil
5 drops lavender essential oil
1 cup coconut oil (get organic if you can!)
1 teaspoon vitamin E oil
1 teaspoon jojoba oil
5 drops lavender essential oil
You’ll also need a food mixer, as well as a container to store your conditioner — I used a small mason jar. All of the ingredients can be purchased at most health food stores, like Trader Joe’s or Whole Foods.
What you do:
Place all ingredients in a mixing bowl. Mix on high for about 8 minutes. Transfer into a container and you’re all set! Because coconut oil melts in high temperatures, those who live in warmth may want to store this in the refrigerator, but there is nothing wrong with using this conditioner in liquid form! This mixture should stay fresh until the coconut oil reaches its expiration date.
Place all ingredients in a mixing bowl. Mix on high for about 8 minutes. Transfer into a container and you’re all set! Because coconut oil melts in high temperatures, those who live in warmth may want to store this in the refrigerator, but there is nothing wrong with using this conditioner in liquid form! This mixture should stay fresh until the coconut oil reaches its expiration date.
To use: Apply a TINY amount of the conditioner to wet hair (after shampooing and rinsing, of course!). You really only need a tiny bit to get the job done! Start at your ends, then jump to the section right below your ears, working into hair in a downward motion. You can apply any remaining oil to the hair that surrounds your face if necessary, but avoid using this near the top of your head. This mixture is made purely out of oils, so it can make your hair appear greasy if you use too much. I used a nickel-sized amount, and my hair is very long. Leave in for about 2-5 minutes, and then rinse.
Once your hair is dry, if you find that you’ve used too much, just use a bit of dry shampoo to soak up some of the oil! :)
*Bonus: Before you get out of the shower, apply the conditioner to your arms and legs – this mixture doubles as an incredibly moisturizing lotion!*
XO, Rachel
DIY: Makeup Brush Cleaner
I
never clean my makeup brushes. Not once in my life have I ever done it. Well,
before today I hadn’t. The brushes I use now I’ve had for at least a
year – and I wear makeup every day, so I can only imagine what terrible things
these bacteria-filled brushes are doing to my precious skin!
I
recently came across this recipe for a homemade makeup brush cleaner and I knew
I had to try it. This mixture will clean your brushes like no other and it’ll
leave them feeling softer than ever. Seriously. I am completely amazed by how
well this stuff works. This cleaner is so incredibly easy to make and it’s made
from things that most of us already have lying around the house!
What you need:
1
cup distilled water
¼ cup rubbing alcohol
½ tablespoon castile soap
½ tablespoon hair shampoo
1 tablespoon leave-in conditioner spray
Small spray bottle
¼ cup rubbing alcohol
½ tablespoon castile soap
½ tablespoon hair shampoo
1 tablespoon leave-in conditioner spray
Small spray bottle
What you do:
Just
mix all ingredients together and pour into your spray bottle!
To
clean, spray the bristles of your makeup brush and then brush onto a clean, dry
paper towel to remove all residue. If your brushes are extra dirty (like mine),
let them soak in the mixture for a half hour or more before brushing onto a
towel. You will be stunned by how well this works!
Clean
makeup brushes are a huge step towards achieving healthy skin, so try to
adding quick cleaning into your weekly schedule! I know I’ll be doing so
XO, Rachel
Friday, July 12, 2013
Roawr!
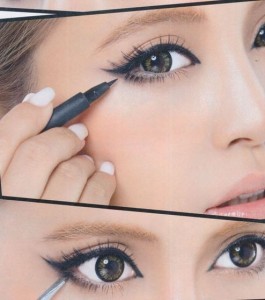
A cat eye is one of my all time favorite looks and is my go to for all occasions.
Needed: Black liquid liner, or for an
easier route, try a gel liner with a thin brush.
Steps:
• Start at the inner corner and drag
the brush along the lash line to the outer corner.• Then imagine a line from the outside corner to the end of your brow that becomes the angle for the wing. With light brush strokes, slowly draw the wing at that angle.
Tips:
If you rest your elbow on a counter
in front of your mirror, if will give you a steadier hand because the only
pivot allowed will be at the wrist.
The firmer you press, the
thicker the line will be.
XO Rachel
Blushing Rose

I love a no fuss look! This tutorial
tells you how to get this simple romantic look, which is gorgeous for both day and
night.
Tools: foundation, rosy cream blush,
rosy lip balm, brown eye liner, mascara
• Apply a thin layer of foundation
to your skin.
• Apply rosy cream blush to the
apples of your cheeks and blend with fingertips.
• Apply rosy lip balm to your
lips.
• Line your lash line with a brown
pencil and blend with a finger.
• Coat top and bottom lashes
with black mascara.
XO Rachel
Subscribe to:
Posts (Atom)